Week 5 [Sep 10]
Todo
Admin info to read:
Outcomes
Design
W5.1 Can explain single responsibility principle
W5.1a Can explain single responsibility principle
Supplmentary → Principles →
Single Responsibility Principle
Single Responsibility Principle (SRP): A class should have one, and only one, reason to change. -- Robert C. Martin
If a class has only one responsibility, it needs to change only when there is a change to that responsibility.
Consider a TextUi class that does parsing of the user commands as well as interacting with the user. That class needs to change when the formatting of the UI changes as well as when
the syntax of the user command changes. Hence, such a class does not follow the SRP.
- An explanation of the SRP from www.oodesign.com
- Another explanation (more detailed) by Patkos Csaba
- A book chapter on SRP - A book chapter on SRP, written by the father of the principle itself Robert C Martin.
Evidence:
Acceptable: Evidence of having used SRP in some project.
Suggested: Do the exercise in [Addressbook-Level2: LO-SRP]
Submission: Create a PR against Addressbook-Level2. Only clean PRs (i.e. free of unrelated code modifications) will be accepted.
Implementation
W5.2 Can implement inheritance
W5.2a Can explain the meaning of inheritance
:
Design → Object Oriented Programming → Inheritance →
What
The OOP concept Inheritance allows you to define a new class based on an existing class.
For example, you can use inheritance to define an EvaluationReport class based on an existing Report class so that the EvaluationReport class does not have
to duplicate code that is already implemented in the Report class. The EvaluationReport can inherit the wordCount attribute and the print() method from the base class Report.
- Other names for Base class: Parent class, Super class
- Other names for Derived class: Child class, Sub class, Extended class
A super class is said to be more general than the sub class. Conversely, a sub class is said to be more specialized than the super class.
Applying inheritance on a group of similar classes can result in the common parts among classes being extracted into more general classes.
Man and Woman behaves the same way for certain things. However, the two classes cannot be simply replaced with a more general class Person because of the
need to distinguish between Man and Woman for certain other things. A solution is to add the Person class as a super class (to contain the code common to men and woment) and let Man and Woman inherit from Person class.
Inheritance implies the derived class can be considered as a sub-type of the base class (and the base class is a super-type of the derived class), resulting in an is a relationship.
Inheritance does not necessarily mean a sub-type relationship exists. However, the two often go hand-in-hand. For simplicity, at this point let us assume inheritance implies a sub-type relationship.
To continue the previous example,
Womanis aPersonManis aPerson
Inheritance relationships through a chain of classes can result in inheritance hierarchies (aka inheritance trees).
Two inheritance hierarchies/trees are given below. Note that Parrot is a Bird as well as it is an Animal. Note that the triangle points
to the parent class.

Multiple Inheritance is when a class inherits directly from multiple classes. Multiple inheritance among classes is allowed in some languages (e.g., Python, C++) but not in other languages (e.g., Java, C#).
The Honey class inherits from the Food class and the Medicine class because honey can be consumed as a food as well as a medicine (in some oriental medicine practices).
Implementing inheritance
To learn how to implement inheritance in Java, you can follow [Oracle’s Java Tutorials: Inheritance]
💡 Java requires all classes to have a parent class. If you do not specify a parent class, Java automatically assigns the Object class as the parent class.
💡 Python automatically assigns the object class as the parent class.
Which of these are correct?
- a. Super class is more general than the sub class.
- b. Child class is more specialized than the parent class.
- c. A class can inherit behavior from its ancestor classes (ancestor classes = classes above it in the inheritance hierarchy).
- d. Code reuse can be one benefit of inheritance.
- e. A change to the super class will not affect its sub classes.
(a) (b) (c) (d)
Explanation: (e) is incorrect. Because sub classes inherit behavior from the super class, any changes to the super class could affect sub classes.
W5.3 Can implement overloading
W5.4 Can implement polymorphism
Method Overriding
W5.4a Can explain method overriding
:
Design → Object Oriented Programming → Inheritance →
Overriding
Method overriding is when a sub-class changes the behavior inherited from the parent class by re-implementing the method. Overridden methods have the same name, same type signature, and same return type.
In a case where EvaluationReport class inherits the Report class,
Report#print()method is overridden byEvaluationReport#print()method.Report#write(String)method is overridden byEvaluationReport#write(String)method.Report#read():Stringmethod is NOT overridden byEvaluationReport#read(int):Stringmethod. Reason: the two methods have different signatures;EvaluationReport#read(int):Stringoverloads (rather than overrides) theReport#read():Stringmethod.
Design → Object Oriented Programming → Inheritance →
Overloading
Method overloading is when there are multiple methods with the same name but different type signatures. Overloading is used to indicate that multiple operations do similar things but take different parameters.
Type Signature: The type signature of an operation is the type sequence of the parameters. The return type and parameter names are not part of the type signature. However, the parameter order is significant.
| Method | Type Signature |
|---|---|
int add(int X, int Y) |
(int, int) |
void add(int A, int B) |
(int, int) |
void m(int X, double Y) |
(int, double) |
void m(double X, int Y) |
(double, int) |
In the case below, the calculate method is overloaded because the two methods have the same name but different type signatures (String) and (int)
calculate(String): voidcalculate(int): void
Implementing overloading
An operation can be overloaded inside the same class or in sub/super classes.
The constructor of the Account class below is overloaded because there are two constructors with different signatures: () and (String, String, double).
Furthermore, the save method in the Account class is overloaded in the child class SavingAccount.
class Account {
    Account () {
        ...
    }

    Account (String name, String number, double balance) {
        ...
    }

    void save(int amount){
        ...
    }
}

class SavingAccount extends Account{

    void save(Double amount){
        ...
    }
}
Resources:
-
Method Overloading in Java a tutorial from javapoint.com. Also mentions the topic of a related topic type promotion.
Implementing overriding
To override a method inherited from an ancestor class, simply re-implement the method in the target class.
A simple example where the Report#print() method is overridden by EvaluationReport#print() method:
class Report{

    void print(){
        System.out.println("Printing report");
    }

}

class EvaluationReport extends Report{

    @Override  // this annotation is optional
    void print(){
        System.out.println("Printing evaluation report");
    }

}

class ReportMain{

    public static void main(String[] args){
        Report report = new Report();
        report.print(); // prints "Printing report"

        EvaluationReport evaluationReport = new EvaluationReport();
        evaluationReport.print(); // prints "Printing evaluation report"
    }
}
Resources:
- Java - Overriding -- a tutorial by tutorialspoint.com
In the example below, Student class overrides the print_info method of its parent class Person:
|
|
|
|
→ |
|
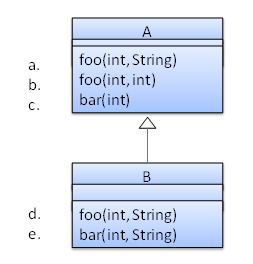
Which of these methods override another method? A is the parent class. B inherits A.
- a
- b
- c
- d
- e
d
Explanation: Method overriding requires a method in a child class to use the same method name and same parameter sequence used by one of its ancestors
Polymorphism
W5.4b Can explain OOP polymorphism
:
Design → Object Oriented Programming → Polymorphism →
What
Polymorphism:
The ability of different objects to respond, each in its own way, to identical messages is called polymorphism. -- Object-Oriented Programming with Objective-C, Apple
Take the example of writing a payroll application for a university to facilitate payroll processing of university staff. Suppose an adjustSalary(int) operation adjusts the salaries of all staff members. This operation
will be executed whenever the university initiates a salary adjustment for its staff. However, the adjustment formula is different for different staff categories, say admin and academic. Here is one possible way of designing the
classes in the Payroll system.
Here is the implementation of the adjustSalary(int) operation.
class Payroll1 {
    ArrayList< Admin > admins;
    ArrayList< Academic > academics;
    // ...

    void adjustSalary(int byPercent) {
        for (Admin ad: admins) {
            ad.adjustSalary(byPercent);
        }
        for (Academic ac: academics) {
            ac.adjustSalary(byPercent);
        }
    }
}
Note how processing is similar for the two staff types. It is as if the type of staff members is irrelevant to how they are processed inside this operation! If that is the case, can the staff type be "abstracted away" from
this method? Here is such an implementation of adjustSalary(int):
class Payroll2 {
    ArrayList< Staff > staff;
    // ...

    void adjustSalary(int byPercent) {
        for (Staff s: staff) {
            s.adjustSalary(byPercent);
        }
    }
}
Notice the following:
- Only one data structure
ArrayList< Staff >. It contains bothAdminandAcademicobjects but treats them asStaffobjects - Only one loop
- Outcome of the
s.adjustSalary(byPercent)method call depends on whethersis anAcademicorAdminobject
The above code is better in several ways:
- It is shorter.
- It is simpler.
- It is more flexible (this code will remain the same even if more staff types are added).
This does not mean we are getting rid of the Academic and Admin classes completely and replacing them with a more general class called Staff. Rather, this part of the code “treats” both Admin and Academic objects as one type called Staff.
For example, ArrayList staff contains both Admin and Academic objects although it treats all of them as Staff objects. However, when the adjustSalary(int) operation
of these objects is called, the resulting salary adjustment will be different for Admin objects and Academic objects. Therefore, different types of objects are treated as a single general type, but yet
each type of object exhibits a different kind of behavior. This is called polymorphism (literally, it means “ability to take many forms”). In this example, an object that is perceived as type Staff can be
an Admin object or an Academic object.
Abstract Classes
W5.4c Can implement abstract classes
:
Design → Object Oriented Programming → Inheritance →
Abstract Classes
Abstract Class:
An abstract class is a class that is declared abstract—it may or may not include abstract methods. Abstract classes cannot be instantiated, but they can be subclassed. -- Oracle's Java Documentation
An abstract method is simply the method interface without the implementation.
The Account class has an abstract method (addInterest()).
A class that has an abstract method becomes an abstract class. Evan a class that does not have any abstract method can be declared as an abstract class. Abstract classes cannot be instantiated.
Implementing abstract classes
Use the abstract keyword to identify abstract classes/methods.
Partial code below gives an example of how to declare abstract classes/methods. The addInterest() method in the Account class is abstract and therefore the Account class itself is abstract. The CurrentAccount class need not be abstract because it overrides the abstract method inherited from the parent class.
abstract class Account {

    int number;

    abstract void addInterest();

    void close(){
        //...
    }
}

class CurrentAccount extends Account{

    @Override
    void addInterest() {
        //...
    }
}
In Java, if a class contains an abstract method, the class itself should be an abstract class i.e. if any methods of the class is 'incomplete', the class itself is 'incomplete'.
Choose the correct statements about Java abstract classes and
- a. A concrete class can contain an abstract method.
- b. An abstract class can contain concrete methods.
- c. An abstract class need not contain any concrete methods.
- d. An abstract class cannot be instantiated.
(b)(c)(d)
Explanation: A concrete class cannot contain even a single abstract method.
Interfaces
W5.4d Can explain interfaces
:
Design → Object Oriented Programming → Inheritance →
Interfaces
An interface is a behavior specification i.e. a collection of
There are a number of situations in software engineering when it is important for disparate groups of programmers to agree to a "contract" that spells out how their software interacts. Each group should be able to write their code without any knowledge of how the other group's code is written. Generally speaking, interfaces are such contracts. --Oracle Docs on Java
Suppose SalariedStaff is an interface that contains two methods setSalary(int) and getSalary(). AcademicStaff can declare itself as implementing the SalariedStaff interface, which means the AcademicStaff class must implement all the methods specified by the SalariedStaff interface i.e., setSalary(int) and getSalary().
A class implementing an interface results in an is-a relationship, just like in class inheritance.
In the example above, AcademicStaff is a SalariedStaff. An AcademicStaff object can be used anywhere a SalariedStaff object is expected
e.g. SalariedStaff ss = new AcademicStaff().
Implementing interfaces
Java allows multiple inheritance among interfaces. A Java class can implement multiple interfaces (and inherit from one class).
The design below is allowed by Java. In case you are not familiar with UML notation used: solid lines indicate normal inheritance; dashed lines indicate interface inheritance; the triangle points to pare parent.
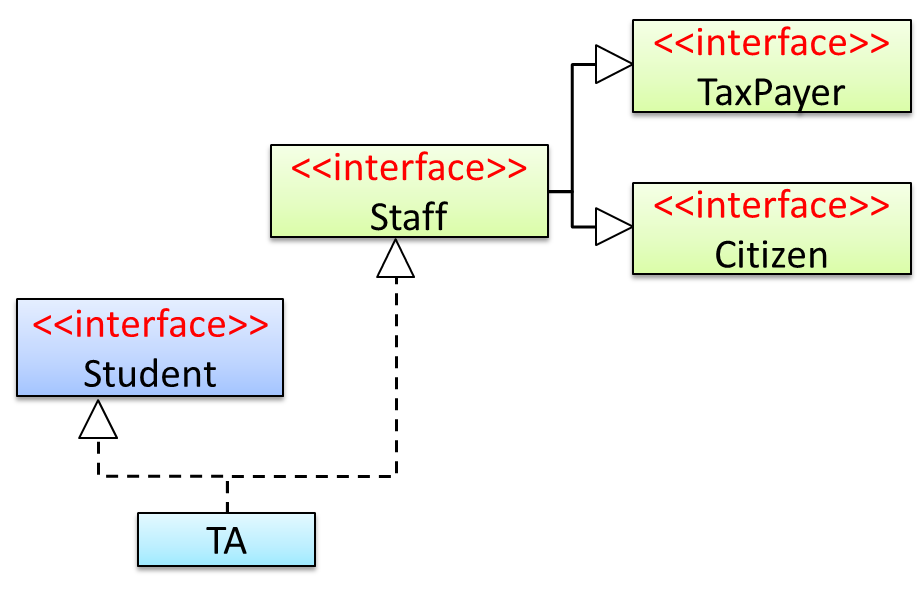
Staffinterface inherits (note the solid lines) the interfacesTaxPayerandCitizen.TAclass implements bothStudentinterface and theStaffinterface.- Because of point 1 above,
TAclass has to implement all methods in the interfacesTaxPayerandCitizen. - Because of points 1,2,3, a
TAis aStaff, is aTaxPayerand is aCitizen.
Java uses the interface keyword to declare interfaces and implements keyword to indicate that a class implements a given interface. Inheritance among interfaces uses the extends keyword, just like inheritance among classes.
The code for the example design given in the previous example:
interface TaxPayer {
    void payTax();
}

interface Citizen {
    void vote();
}

interface Staff extends Citizen, TaxPayer{
    void work();
}

interface Student {
    void learn();
}

class TA implements Student, Staff{

    @Override
    public void payTax() {
        //...
    }

    @Override
    public void vote() {
        //...
    }

    @Override
    public void work() {
        //...
    }

    @Override
    public void learn() {
        //...
    }
}
Quality Assurance
W5.5 Can use simple JUnit tests
W5.5a Can explain developer testing
Quality Assurance → Testing → Developer Testing →
What
Developer testing is the testing done by the developers themselves as opposed to professional testers or end-users.
W5.5b Can explain the need for early developer testing
Quality Assurance → Testing → Developer Testing →
Why
Delaying testing until the full product is complete has a number of disadvantages:
- Locating the cause of such a test case failure is difficult due to a large search space; in a large system, the search space could be millions of lines of code, written by hundreds of developers! The failure may also be due to multiple inter-related bugs.
- Fixing a bug found during such testing could result in major rework, especially if the bug originated during the design or during requirements specification i.e. a faulty design or faulty requirements.
- One bug might 'hide' other bugs, which could emerge only after the first bug is fixed.
- The delivery may have to be delayed if too many bugs were found during testing.
Therefore, it is better to do early testing, as hinted by the popular rule of thumb given below, also illustrated by the graph below it.
The earlier a bug is found, the easier and cheaper to have it fixed.

Such early testing of partially developed software is usually, and by necessity, done by the developers themselves i.e. developer testing.
Discuss pros and cons of developers testing their own code.
Pros:
- Can be done early (the earlier we find a bug, the cheaper it is to fix).
- Can be done at lower levels, for examples, at operation and class level (testers usually test the system at UI level).
- It is possible to do more thorough testing because developers know the expected external behavior as well as the internal structure of the component.
- It forces developers to take responsibility for their own work (they cannot claim that "testing is the job of the testers").
Cons:
- A developer may unconsciously test only situations that he knows to work (i.e. test it too 'gently').
- A developer may be blind to his own mistakes (if he did not consider a certain combination of input while writing code, it is possible for him to miss it again during testing).
- A developer may have misunderstood what the SUT is supposed to do in the first place.
- A developer may lack the testing expertise.
The cost of fixing a bug goes down as we reach the product release.
False. The cost goes up over time.
Explain why early testing by developers is important.
Evidence:
Explain why early testing by developers is important.
W5.5c Can explain test drivers
Quality Assurance → Testing → Test Automation →
Test Automation Using Test Drivers
A test driver is the code that ‘drives’ the
PayrollTest ‘drives’ the PayRoll class by sending it test inputs and verifies if the output is as expected.
public class PayrollTestDriver {
    public static void main(String[] args) throws Exception {

        //test setup
        Payroll p = new Payroll();

        //test case 1
        p.setEmployees(new String[]{"E001", "E002"});
        // automatically verify the response
        if (p.totalSalary() != 6400) {
            throw new Error("case 1 failed ");
        }

        //test case 2
        p.setEmployees(new String[]{"E001"});
        if (p.totalSalary() != 2300) {
            throw new Error("case 2 failed ");
        }

        //more tests...

        System.out.println("All tests passed");
    }
}
W5.5d Can explain test automation tools
Quality Assurance → Testing → Test Automation →
Test Automation Tools
JUnit is a tool for automated testing of Java programs. Similar tools are available for other languages.
This an automated test for a Payroll class, written using JUnit libraries.
public class PayrollTestJUnit {

    @Test
    public void testTotalSalary(){
        Payroll p = new Payroll();

        //test case 1
        p.setEmployees(new String[]{"E001", "E002"});
        assertEquals(p.totalSalary(), 6400);

        //test case 2
        p.setEmployees(new String[]{"E001"});
        assertEquals(p.totalSalary(), 2300);

        //more tests...
    }
}
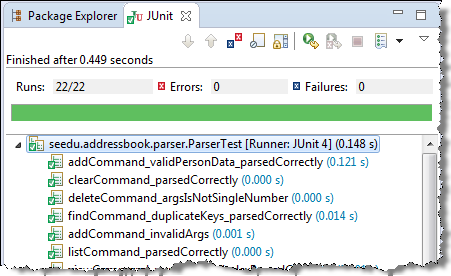
Most modern IDEs has integrated support for testing tools. The figure below shows the JUnit output when running some JUnit tests using the Eclipse IDE.
W5.5e Can use simple JUnit tests
Tools → JUnit →
JUnit: Basic
JUnit 4 with IntelliJ: A quick introduction -- by DrBFraser
- JUnit cookbook - a short tutorial from JUnit creators
- JUnit tutorial - a more detailed tutorial from a developer Lars Vogel
- How to test private methods in Java? [ short answer ] [ long answer ]
Evidence:
Acceptable: Evidence of having written JUnit tests in some project.
Suggested: Do the exercise in [Addressbook-Level2: LO-JUnit]
Submission: Create a PR against Addressbook-Level2. Only clean PRs (i.e. free of unrelated code modifications) will be accepted.
Project Management
W5.6 Can use GitHub PRs in a workflow
W5.6a Can use Git to resolve merge conflicts
Tools → Git and GitHub →
Merge Conflicts
1. Start a branch named fix1 in a local repo. Create a commit that adds a line with some text to one of the files.
2. Switch back to master branch. Create a commit with a conflicting change i.e. it adds a line with some different text in the exact location the previous line was added.
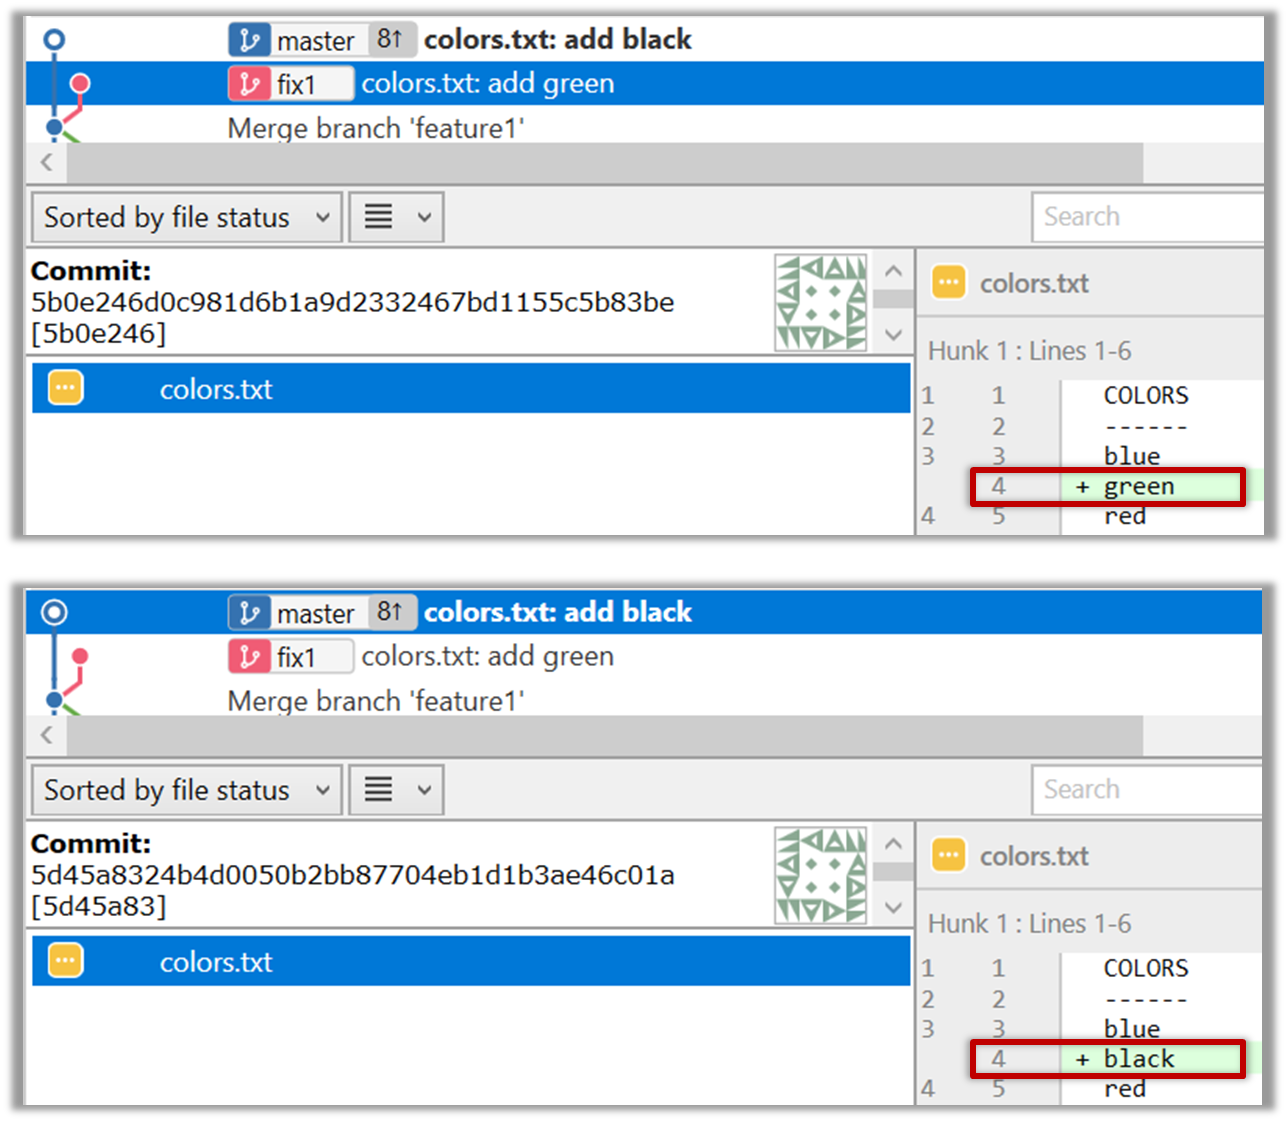
3. Try to merge the fix1 branch onto the master branch. Git will pause mid-way during the merge and report a merge conflict. If you open the conflicted file, you will see something like
this:
COLORS
------
blue
<<<<<<< HEAD
black
=======
green
>>>>>>> fix1
red
white
4. Observe how the conflicted part is marked between a line starting with <<<<<<< and a line starting with >>>>>>>, separated by another line
starting with =======.
This is the conflicting part that is coming from the master branch:
<<<<<<< HEAD
black
=======
This is the conflicting part that is coming from the fix1 branch:
=======
green
>>>>>>> fix1
5. Resolve the conflict by editing the file. Let us assume you want to keep both lines in the merged version. You can modify the file to be like this:
COLORS
------
blue
black
green
red
white
6. Stage the changes, and commit.
Evidence:
Acceptable: Merge conflicts resolved in any repo.
Suggested: Evidence of following the steps in the LO.
Submission: Show your merge commit during the tutorial.
W5.6b Can review and merge PRs on GitHub
Tools → Git and GitHub →
Manage PRs
1. Go to GitHub page of your fork and review the add-intro PR you created previously in [
1. Fork the samplerepo-pr-practice onto your GitHub account. Clone it onto your computer.
2. Create a branch named add-intro in your clone. Add a couple of commits which adds/modifies an Introduction section to the README.md. Example:
# Introduction
Creating Pull Requsts (PRs) is needed when using RCS in a multi-person projects.
This repo can be used to practice creating PRs.
3. Push the add-intro branch to your fork.
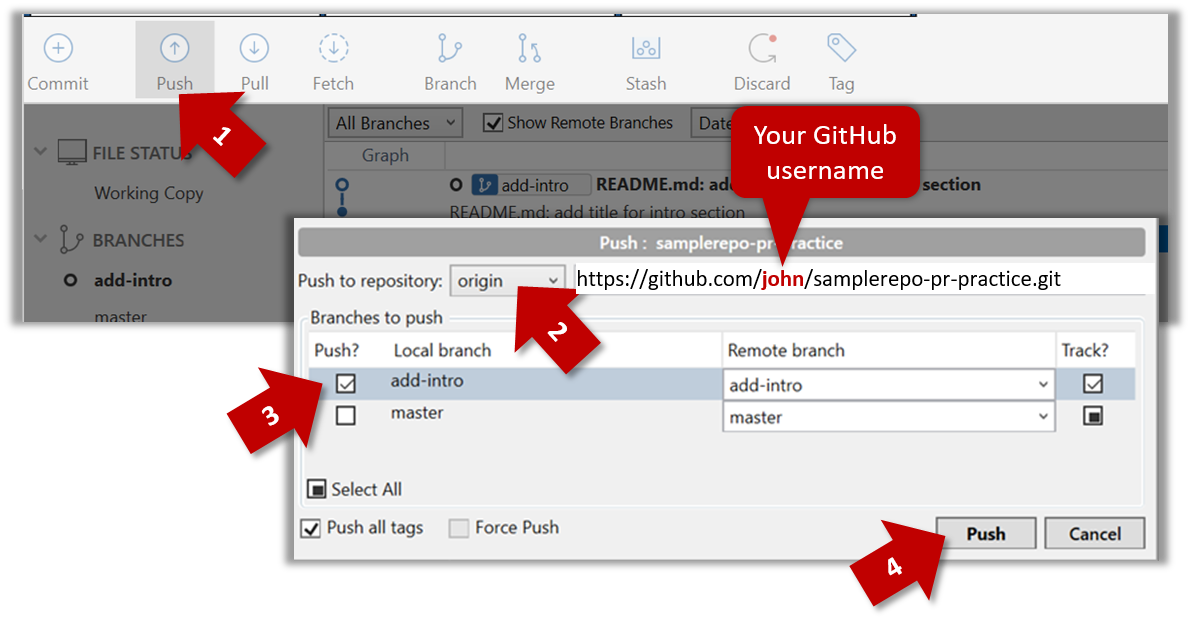
git push origin add-intro
4. Create a Pull Request from the add-intro branch in your fork to the master branch of the same fork (i.e. your-user-name/samplerepo-pr-practice, not se-edu/samplerepo-pr-practice),
as described below.
4a. Go to the GitHub page of your fork (i.e. https://github.com/{your_username}/samplerepo-pr-practice), click on the Pull Requests tab, and then click on New Pull Request button.

4b. Select base fork and head fork as follows:
base fork: your own fork (i.e.{your user name}/samplerepo-pr-practice, NOTse-edu/samplerepo-pr-practice)head fork: your own fork.

The base fork is where changes should be applied. The head fork contains the changes you would like to be applied.
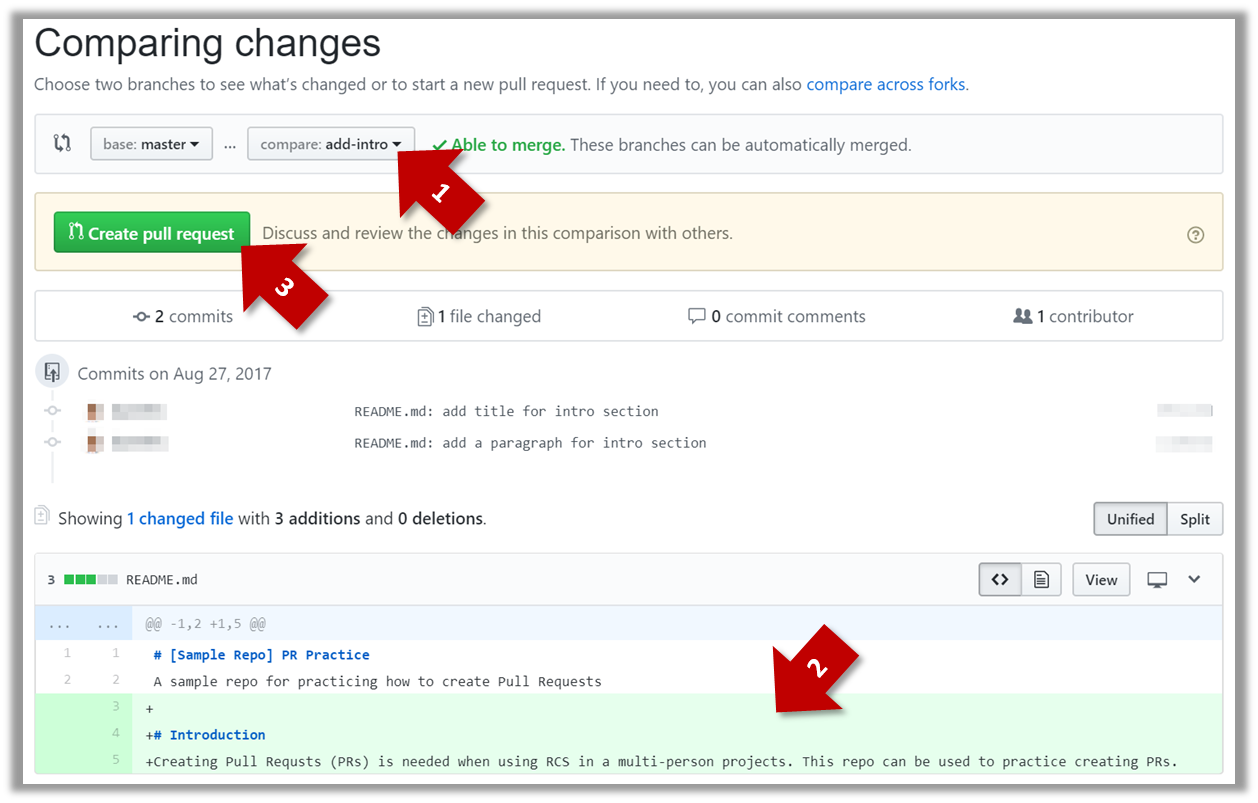
4c. (1) Set the base branch to master and head branch to add-intro, (2) confirm the diff contains the changes you propose to merge in this PR (i.e. confirm that you did not accidentally include extra commits in the branch),
and (3) click the Create pull request button.
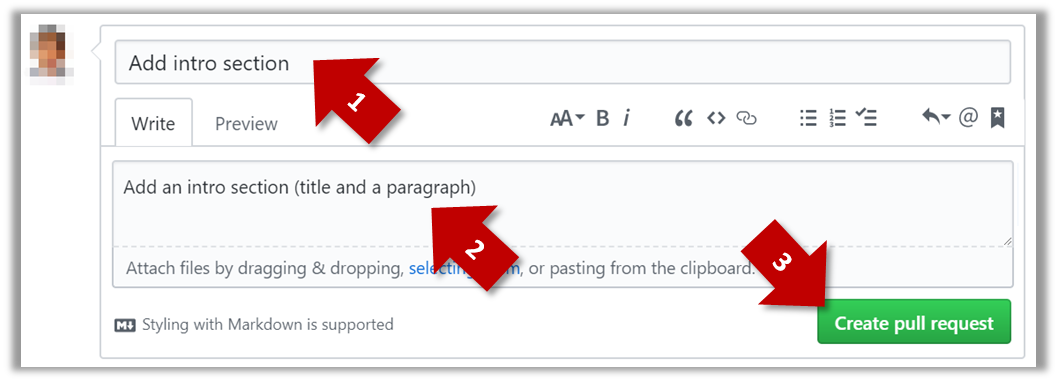
4d. (1) Set PR name, (2) set PR description, and (3) Click the Create pull request button.
A common newbie mistake when creating branch-based PRs is to mix commits of one PR with another. To learn how to avoid that mistake, you are encouraged to continue and create another PR as explained below.
5. In your local repo, create a new branch add-summary off the master branch.
When creating the new branch, it is very important that you switch back to the master branch first. If not, the new branch will be created off the current branch add-intro. And that is how you
end up having commits of the first PR in the second PR as well.
6. Add a commit in the add-summary branch that adds a Summary section to the README.md, in exactly the same place you added the Introduction section earlier.

7. Push the add-summary to your fork and create a new PR similar to before.
1a. Go to the respective PR page and click on the Files changed tab. Hover over the line you want to comment on and click on the icon that
appears on the left margin. That should create a text box for you to enter your comment.
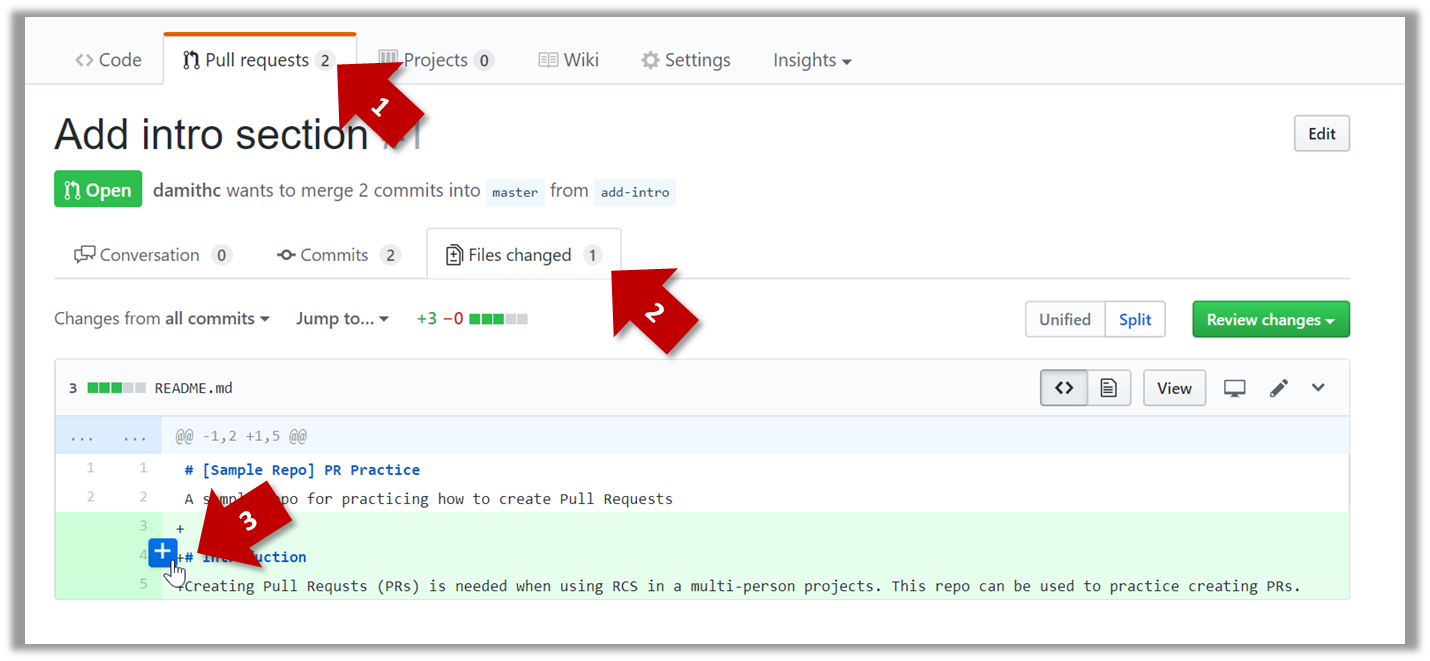
1b. Enter some dummy comment and click on Start a review button.
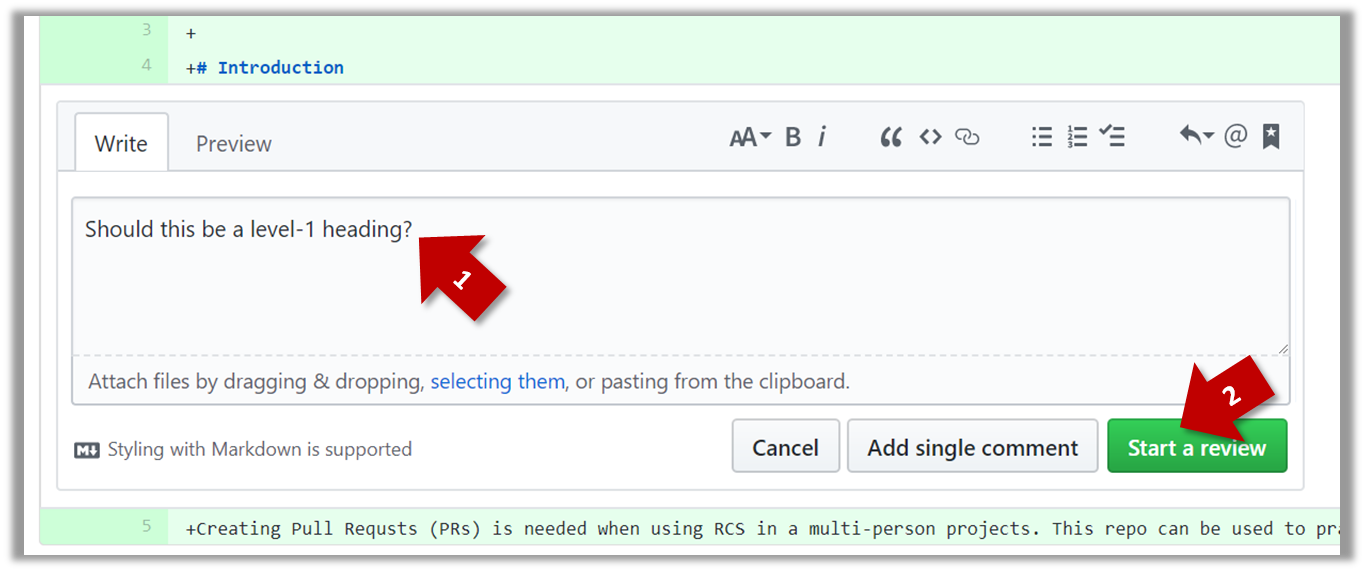
1c. Add a few more comments in other places of the code.
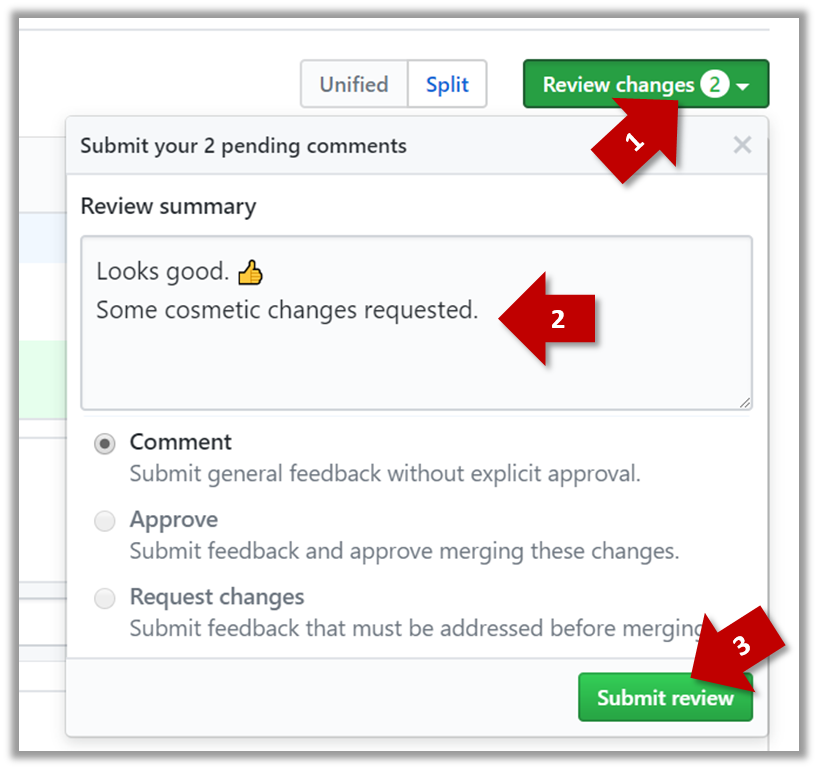
1d. Click on the Review Changes button, enter an overall comment, and click on the Submit review button.
2. Update the PR to simulate revising the code based on reviewer comments. Add some more commits to the add-intro branch and push the new commits to the fork. Observe how the PR is updated automatically
to reflect the new code.
3. Merge the PR. Go to the GitHub page of the respective PR, scroll to the bottom of the Conversation tab, and click on the Merge pull request button, followed by the Confirm merge button. You should see a Pull request successfully merged and closed message after the PR is merged.

4. Sync the local repo with the remote repo. Because of the merge you did on the GitHub, the master branch of your fork is now ahead of your local repo by one commit. To sync the local repo with the
remote repo, pull the master branch to the local repo.
git checkout master
git pull origin master
Observe how the add-intro branch is now merged to the master branch in your local repo as well.
5. De-conflict the add-summary PR. Note that GitHub page for the add-summary PR is now showing a conflict (when you scroll to the bottom of that page, you should see a message This branch has conflicts that must be resolved).
You can resolve it locally and update the PR accordingly, as explained below.
5a. Switch to the add-summary branch. To make that branch up-to-date with the master branch, merge the master branch to it, which will surface the merge conflict. Resolve it and complete the
merge.
5b. Push the updated add-summary branch to the fork. That will remove the 'merge conflicts' warning in the GitHub page of the PR.
6. Merge the add-summary PR using the GitHub interface, similar to how you merged the previous PR.
Note that you could have merged the add-summary branch to the master branch locally before pushing it to GitHub. In that case, the PR will be merged on GitHub automatically to reflect that the branch
has been merged already.
Evidence:
Acceptable: PRs you merged in any repo.
Suggested: Evidence of following the steps in the LO.
Submission: Show your merged PRs during the tutorial.
W5.7 Can follow Forking Workflow
W5.7a Can explain forking workflow
Project Management → Revision Control →
Forking Flow

In the forking workflow, the 'official' version of the software is kept in a remote repo designated as the 'main repo'. All team members fork the main repo create pull requests from their fork to the main repo.
To illustrate how the workflow goes, let’s assume Jean wants to fix a bug in the code. Here are the steps:
- Jean creates a separate branch in her local repo and fixes the bug in that branch.
- Jean pushes the branch to her fork.
- Jean creates a pull request from that branch in her fork to the main repo.
- Other members review Jean’s pull request.
- If reviewers suggested any changes, Jean updates the PR accordingly.
- When reviewers are satisfied with the PR, one of the members (usually the team lead or a designated 'maintainer' of the main repo) merges the PR, which brings Jean’s code to the main repo.
- Other members, realizing there is new code in the upstream repo, sync their forks with the new upstream repo (i.e. the main repo). This is done by pulling the new code to their own local repo and pushing the updated code to their own fork.
- A detailed explanation of the Forking Workflow - From Atlassian
W5.7b Can follow Forking Workflow
Tools → Git and GitHub →
Forking Workflow
This activity is best done as a team. If you are learning this alone, you can simulate a team by using two different browsers to log into GitHub using two different accounts.
-
One member: set up the team org and the team repo.
- Create a GitHub organization for your team. The org name is up to you. We'll refer to this organization as team org from now on.
- Add a team called
developersto your team org. - Add your team members to the
developersteam. - Fork se-edu/samplerepo-workflow-practice to your team org. We'll refer to this as the team repo.
- Add the forked repo to the
developersteam. Give write access.
-
Each team member: create PRs via own fork
- Fork that repo from your team org to your own GitHub account.
- Create a PR to add a file
yourName.md(e.g.jonhDoe.md) containing a brief resume of yourself (branch → commit → push → create PR)
-
For each PR: review, update, and merge.
- A team member (not the PR author): Review the PR by adding comments (can be just dummy comments).
- PR author: Update the PR by pushing more commits to it, to simulate updating the PR based on review comments.
- Another team member: Merge the PR using the GitHub interface.
- All members: Sync your local repo (and your fork) with upstream repo. In this case, your upstream repo is the repo in your team org.
-
Create conflicting PRs.
- Each team member: Create a PR to add yourself under the
Team Memberssection in theREADME.md. - One member: in the
masterbranch, remove John Doe and Jane Doe from theREADME.md, commit, and push to the main repo.
- Each team member: Create a PR to add yourself under the
-
Merge conflicting PRs one at a time. Before merging a PR, you’ll have to resolve conflicts. Steps:
- [Optional] A member can inform the PR author (by posting a comment) that there is a conflict in the PR.
- PR author: Pull the
masterbranch from the repo in your team org. Merge the pulledmasterbranch to your PR branch. Resolve the merge conflict that crops up during the merge. Push the updated PR branch to your fork. - Another member or the PR author: When GitHub does not indicate a conflict anymore, you can go ahead and merge the PR.
Evidence:
Acceptable: Evidence of following the forking workflow with the current team members using any repo.
Suggested: Evidence of following the steps in the LO with current team members.
Submission: Show during the tutorial.
W5.7c Can explain DRCS vs CRCS
Project Management → Revision Control →
DRCS vs CRCS
RCS can be done in two ways: the centralized way and the distributed way.
Centralized RCS (CRCS for short)uses a central remote repo that is shared by the team. Team members download (‘pull’) and upload (‘push’) changes between their own local repositories and the central repository. Older RCS tools such as CVS and SVN support only this model. Note that these older RCS do not support the notion of a local repo either. Instead, they force users to do all the versioning with the remote repo.
Distributed RCS (DRCS for short, also known as Decentralized RCS) allows multiple remote repos and pulling and pushing can be done among them in arbitrary ways. The workflow can vary differently from team to team. For example, every team member can have his/her own remote repository in addition to their own local repository, as shown in the diagram below. Git and Mercurial are some prominent RCS tools that support the distributed approach.
W5.7d Can explain feature branch flow
Project Management → Revision Control →
Feature Branch Flow
Feature branch workflow is similar to forking workflow except there are no forks or PRs. Everyone is pushing/pulling from the same remote repo. The phrase feature branch is used because each new feature (or bug fix, or any other modification) is done in a separate branch.

- A detailed explanation of the Feature Branch Workflow - From Atlassian
W5.7e Can explain centralized flow
Project Management → Revision Control →
Centralized Flow
The centralized workflow is similar to the feature branch workflow except all changes are done in the master branch.
- A detailed explanation of the Centralized Workflow - From Atlassian
🅿️ Project
W5.8 Can work with a 2KLoC code base
This LO can earn you 2 participation marks, 1 mark for the individual component and 1 for the team component. You can omit either one of them.
💡 When working with existing code, a safe approach is to change the code in very small steps, each resulting in a verifiable change without breaking the app. For example, when adding a new sort command, the first
few steps can be,
- Teach the app to accept a
sortcommand but ignore it. - Next, teach the app to direct the
sortcommand to an existing command e.g.sortcommand simply invokes thelistcommand internally. - Add a
SortCommandclass but make it simply a copy of the the existingListCommand. Direct thesortcommand to the newSortCommand. - ...
💡 Note that you can reuse the code you write here in your final project, if applicable.
Individual component:
Requirements: Do an enhancement to [AddressBook - Level2] e.g. add a new command. It can be the same enhancement you did to AddressBook Level1 (at the 1KLoC milestone in week 3). The size of the enhancement does not matter but you must,
- update the User Guide
- update existing tests and add new tests if necessary, for both JUnit tests and I/O tests
- follow the coding standard
- follow the OOP style
Optional but encouraged:
- Update the Developer Guide
Submission:
- Options 1 (discouraged): Show the relevant code during the tutorial.
- Options 2 (preferred): Create a pull request by following the instructions below.
If you choose option 2, we recommend that you complete this week's Project Management LOs first; there are many ways to create PRs but we expect you to create PRs in a specific way, as specified in the LOs.
Team component:
The team component is to be done by all members, including those who didn't do the individual component.
-
Review PRs created by team members in the Individual Component above i.e. add review comments in the PR created against module repo. You can either give suggestions to improve, or ask questions to understand, the code written by the team member.
-
Requirements: Try to ensure that each PR reviewed by at least one team member and each team member's PR is reviewed by at least one other team member.
-
Submission: Just update PR created in the individual component by adding comments/commits to it.
W5.9 Can conceptualize a product
Covered by:
Tutorial 5
W5.1a Can explain single responsibility principle
Supplmentary → Principles →
Single Responsibility Principle
Single Responsibility Principle (SRP): A class should have one, and only one, reason to change. -- Robert C. Martin
If a class has only one responsibility, it needs to change only when there is a change to that responsibility.
Consider a TextUi class that does parsing of the user commands as well as interacting with the user. That class needs to change when the formatting of the UI changes as well as when
the syntax of the user command changes. Hence, such a class does not follow the SRP.
- An explanation of the SRP from www.oodesign.com
- Another explanation (more detailed) by Patkos Csaba
- A book chapter on SRP - A book chapter on SRP, written by the father of the principle itself Robert C Martin.
Evidence:
Acceptable: Evidence of having used SRP in some project.
Suggested: Do the exercise in [Addressbook-Level2: LO-SRP]
Submission: Create a PR against Addressbook-Level2. Only clean PRs (i.e. free of unrelated code modifications) will be accepted.
W5.5b Can explain the need for early developer
testing
Quality Assurance → Testing → Developer Testing →
Why
Delaying testing until the full product is complete has a number of disadvantages:
- Locating the cause of such a test case failure is difficult due to a large search space; in a large system, the search space could be millions of lines of code, written by hundreds of developers! The failure may also be due to multiple inter-related bugs.
- Fixing a bug found during such testing could result in major rework, especially if the bug originated during the design or during requirements specification i.e. a faulty design or faulty requirements.
- One bug might 'hide' other bugs, which could emerge only after the first bug is fixed.
- The delivery may have to be delayed if too many bugs were found during testing.
Therefore, it is better to do early testing, as hinted by the popular rule of thumb given below, also illustrated by the graph below it.
The earlier a bug is found, the easier and cheaper to have it fixed.

Such early testing of partially developed software is usually, and by necessity, done by the developers themselves i.e. developer testing.
Discuss pros and cons of developers testing their own code.
Pros:
- Can be done early (the earlier we find a bug, the cheaper it is to fix).
- Can be done at lower levels, for examples, at operation and class level (testers usually test the system at UI level).
- It is possible to do more thorough testing because developers know the expected external behavior as well as the internal structure of the component.
- It forces developers to take responsibility for their own work (they cannot claim that "testing is the job of the testers").
Cons:
- A developer may unconsciously test only situations that he knows to work (i.e. test it too 'gently').
- A developer may be blind to his own mistakes (if he did not consider a certain combination of input while writing code, it is possible for him to miss it again during testing).
- A developer may have misunderstood what the SUT is supposed to do in the first place.
- A developer may lack the testing expertise.
The cost of fixing a bug goes down as we reach the product release.
False. The cost goes up over time.
Explain why early testing by developers is important.
Evidence:
Explain why early testing by developers is important.
W5.5e Can use simple JUnit tests
Tools → JUnit →
JUnit: Basic
JUnit 4 with IntelliJ: A quick introduction -- by DrBFraser
- JUnit cookbook - a short tutorial from JUnit creators
- JUnit tutorial - a more detailed tutorial from a developer Lars Vogel
- How to test private methods in Java? [ short answer ] [ long answer ]
Evidence:
Acceptable: Evidence of having written JUnit tests in some project.
Suggested: Do the exercise in [Addressbook-Level2: LO-JUnit]
Submission: Create a PR against Addressbook-Level2. Only clean PRs (i.e. free of unrelated code modifications) will be accepted.
W5.6a Can use Git to resolve merge conflicts
Tools → Git and GitHub →
Merge Conflicts
1. Start a branch named fix1 in a local repo. Create a commit that adds a line with some text to one of the files.
2. Switch back to master branch. Create a commit with a conflicting change i.e. it adds a line with some different text in the exact location the previous line was added.

3. Try to merge the fix1 branch onto the master branch. Git will pause mid-way during the merge and report a merge conflict. If you open the conflicted file, you will see something like
this:
COLORS
------
blue
<<<<<<< HEAD
black
=======
green
>>>>>>> fix1
red
white
4. Observe how the conflicted part is marked between a line starting with <<<<<<< and a line starting with >>>>>>>, separated by another line
starting with =======.
This is the conflicting part that is coming from the master branch:
<<<<<<< HEAD
black
=======
This is the conflicting part that is coming from the fix1 branch:
=======
green
>>>>>>> fix1
5. Resolve the conflict by editing the file. Let us assume you want to keep both lines in the merged version. You can modify the file to be like this:
COLORS
------
blue
black
green
red
white
6. Stage the changes, and commit.
Evidence:
Acceptable: Merge conflicts resolved in any repo.
Suggested: Evidence of following the steps in the LO.
Submission: Show your merge commit during the tutorial.
W5.6b Can review and merge PRs on GitHub
Tools → Git and GitHub →
Manage PRs
1. Go to GitHub page of your fork and review the add-intro PR you created previously in [
1. Fork the samplerepo-pr-practice onto your GitHub account. Clone it onto your computer.
2. Create a branch named add-intro in your clone. Add a couple of commits which adds/modifies an Introduction section to the README.md. Example:
# Introduction
Creating Pull Requsts (PRs) is needed when using RCS in a multi-person projects.
This repo can be used to practice creating PRs.
3. Push the add-intro branch to your fork.

git push origin add-intro
4. Create a Pull Request from the add-intro branch in your fork to the master branch of the same fork (i.e. your-user-name/samplerepo-pr-practice, not se-edu/samplerepo-pr-practice),
as described below.
4a. Go to the GitHub page of your fork (i.e. https://github.com/{your_username}/samplerepo-pr-practice), click on the Pull Requests tab, and then click on New Pull Request button.

4b. Select base fork and head fork as follows:
base fork: your own fork (i.e.{your user name}/samplerepo-pr-practice, NOTse-edu/samplerepo-pr-practice)head fork: your own fork.

The base fork is where changes should be applied. The head fork contains the changes you would like to be applied.
4c. (1) Set the base branch to master and head branch to add-intro, (2) confirm the diff contains the changes you propose to merge in this PR (i.e. confirm that you did not accidentally include extra commits in the branch),
and (3) click the Create pull request button.

4d. (1) Set PR name, (2) set PR description, and (3) Click the Create pull request button.

A common newbie mistake when creating branch-based PRs is to mix commits of one PR with another. To learn how to avoid that mistake, you are encouraged to continue and create another PR as explained below.
5. In your local repo, create a new branch add-summary off the master branch.
When creating the new branch, it is very important that you switch back to the master branch first. If not, the new branch will be created off the current branch add-intro. And that is how you
end up having commits of the first PR in the second PR as well.
6. Add a commit in the add-summary branch that adds a Summary section to the README.md, in exactly the same place you added the Introduction section earlier.

7. Push the add-summary to your fork and create a new PR similar to before.
1a. Go to the respective PR page and click on the Files changed tab. Hover over the line you want to comment on and click on the icon that
appears on the left margin. That should create a text box for you to enter your comment.

1b. Enter some dummy comment and click on Start a review button.

1c. Add a few more comments in other places of the code.
1d. Click on the Review Changes button, enter an overall comment, and click on the Submit review button.

2. Update the PR to simulate revising the code based on reviewer comments. Add some more commits to the add-intro branch and push the new commits to the fork. Observe how the PR is updated automatically
to reflect the new code.
3. Merge the PR. Go to the GitHub page of the respective PR, scroll to the bottom of the Conversation tab, and click on the Merge pull request button, followed by the Confirm merge button. You should see a Pull request successfully merged and closed message after the PR is merged.

4. Sync the local repo with the remote repo. Because of the merge you did on the GitHub, the master branch of your fork is now ahead of your local repo by one commit. To sync the local repo with the
remote repo, pull the master branch to the local repo.
git checkout master
git pull origin master
Observe how the add-intro branch is now merged to the master branch in your local repo as well.
5. De-conflict the add-summary PR. Note that GitHub page for the add-summary PR is now showing a conflict (when you scroll to the bottom of that page, you should see a message This branch has conflicts that must be resolved).
You can resolve it locally and update the PR accordingly, as explained below.
5a. Switch to the add-summary branch. To make that branch up-to-date with the master branch, merge the master branch to it, which will surface the merge conflict. Resolve it and complete the
merge.
5b. Push the updated add-summary branch to the fork. That will remove the 'merge conflicts' warning in the GitHub page of the PR.
6. Merge the add-summary PR using the GitHub interface, similar to how you merged the previous PR.
Note that you could have merged the add-summary branch to the master branch locally before pushing it to GitHub. In that case, the PR will be merged on GitHub automatically to reflect that the branch
has been merged already.
Evidence:
Acceptable: PRs you merged in any repo.
Suggested: Evidence of following the steps in the LO.
Submission: Show your merged PRs during the tutorial.
W5.7b Can follow Forking Workflow
Tools → Git and GitHub →
Forking Workflow
This activity is best done as a team. If you are learning this alone, you can simulate a team by using two different browsers to log into GitHub using two different accounts.
-
One member: set up the team org and the team repo.
- Create a GitHub organization for your team. The org name is up to you. We'll refer to this organization as team org from now on.
- Add a team called
developersto your team org. - Add your team members to the
developersteam. - Fork se-edu/samplerepo-workflow-practice to your team org. We'll refer to this as the team repo.
- Add the forked repo to the
developersteam. Give write access.
-
Each team member: create PRs via own fork
- Fork that repo from your team org to your own GitHub account.
- Create a PR to add a file
yourName.md(e.g.jonhDoe.md) containing a brief resume of yourself (branch → commit → push → create PR)
-
For each PR: review, update, and merge.
- A team member (not the PR author): Review the PR by adding comments (can be just dummy comments).
- PR author: Update the PR by pushing more commits to it, to simulate updating the PR based on review comments.
- Another team member: Merge the PR using the GitHub interface.
- All members: Sync your local repo (and your fork) with upstream repo. In this case, your upstream repo is the repo in your team org.
-
Create conflicting PRs.
- Each team member: Create a PR to add yourself under the
Team Memberssection in theREADME.md. - One member: in the
masterbranch, remove John Doe and Jane Doe from theREADME.md, commit, and push to the main repo.
- Each team member: Create a PR to add yourself under the
-
Merge conflicting PRs one at a time. Before merging a PR, you’ll have to resolve conflicts. Steps:
- [Optional] A member can inform the PR author (by posting a comment) that there is a conflict in the PR.
- PR author: Pull the
masterbranch from the repo in your team org. Merge the pulledmasterbranch to your PR branch. Resolve the merge conflict that crops up during the merge. Push the updated PR branch to your fork. - Another member or the PR author: When GitHub does not indicate a conflict anymore, you can go ahead and merge the PR.
Evidence:
Acceptable: Evidence of following the forking workflow with the current team members using any repo.
Suggested: Evidence of following the steps in the LO with current team members.
Submission: Show during the tutorial.
W5.8 Can work with a 2KLoC code base
This LO can earn you 2 participation marks, 1 mark for the individual component and 1 for the team component. You can omit either one of them.
💡 When working with existing code, a safe approach is to change the code in very small steps, each resulting in a verifiable change without breaking the app. For example, when adding a new sort command, the
first few steps can be,
- Teach the app to accept a
sortcommand but ignore it. - Next, teach the app to direct the
sortcommand to an existing command e.g.sortcommand simply invokes thelistcommand internally. - Add a
SortCommandclass but make it simply a copy of the the existingListCommand. Direct thesortcommand to the newSortCommand. - ...
💡 Note that you can reuse the code you write here in your final project, if applicable.
Individual component:
Requirements: Do an enhancement to [AddressBook - Level2] e.g. add a new command. It can be the same enhancement you did to AddressBook Level1 (at the 1KLoC milestone in week 3). The size of the enhancement does not matter but you must,
- update the User Guide
- update existing tests and add new tests if necessary, for both JUnit tests and I/O tests
- follow the coding standard
- follow the OOP style
Optional but encouraged:
- Update the Developer Guide
Submission:
- Options 1 (discouraged): Show the relevant code during the tutorial.
- Options 2 (preferred): Create a pull request by following the instructions below.
If you choose option 2, we recommend that you complete this week's Project Management LOs first; there are many ways to create PRs but we expect you to create PRs in a specific way, as specified in the LOs.
Team component:
The team component is to be done by all members, including those who didn't do the individual component.
-
Review PRs created by team members in the Individual Component above i.e. add review comments in the PR created against module repo. You can either give suggestions to improve, or ask questions to understand, the code written by the team member.
-
Requirements: Try to ensure that each PR reviewed by at least one team member and each team member's PR is reviewed by at least one other team member.
-
Submission: Just update PR created in the individual component by adding comments/commits to it.
W5.9 Can conceptualize a product
Covered by:
Lecture 5
[slides]